
Steam Deck Tips: How to add a Non-Steam App With All Artwork - A Complete Guide
As it turns out (much to my glee), there are many things to know about the Steam Deck. Once you’ve played through a bunch of games native to Steam, chances are you will venture out at some point to the wonderful world of Non-Steam Apps. Not everything is on Steam after all, such as the highly popular game known as Minecraft.
For our example today, I’ll be walking you through how to add a non-Steam app – in this case the popular gaming communication tool Discord – as well as all the artwork for it in full. A quick point here: although Discord is usable in Gaming Mode, you will need to shutdown your Steam Deck by holding the [Power] button for 10 seconds when done using it. The reason is for the time being the Steam Deck freezes when trying to exit while in this mode. It’s an unfortunate quirk that will hopefully be fixed in future, but you can still use it just fine when playing games. Even though Discord is our example, this knowledge can be transferred to all non-Steam apps you wish to add. Let’s help you plucky Steam Deck upstarts find your footing!
Let’s Get Started
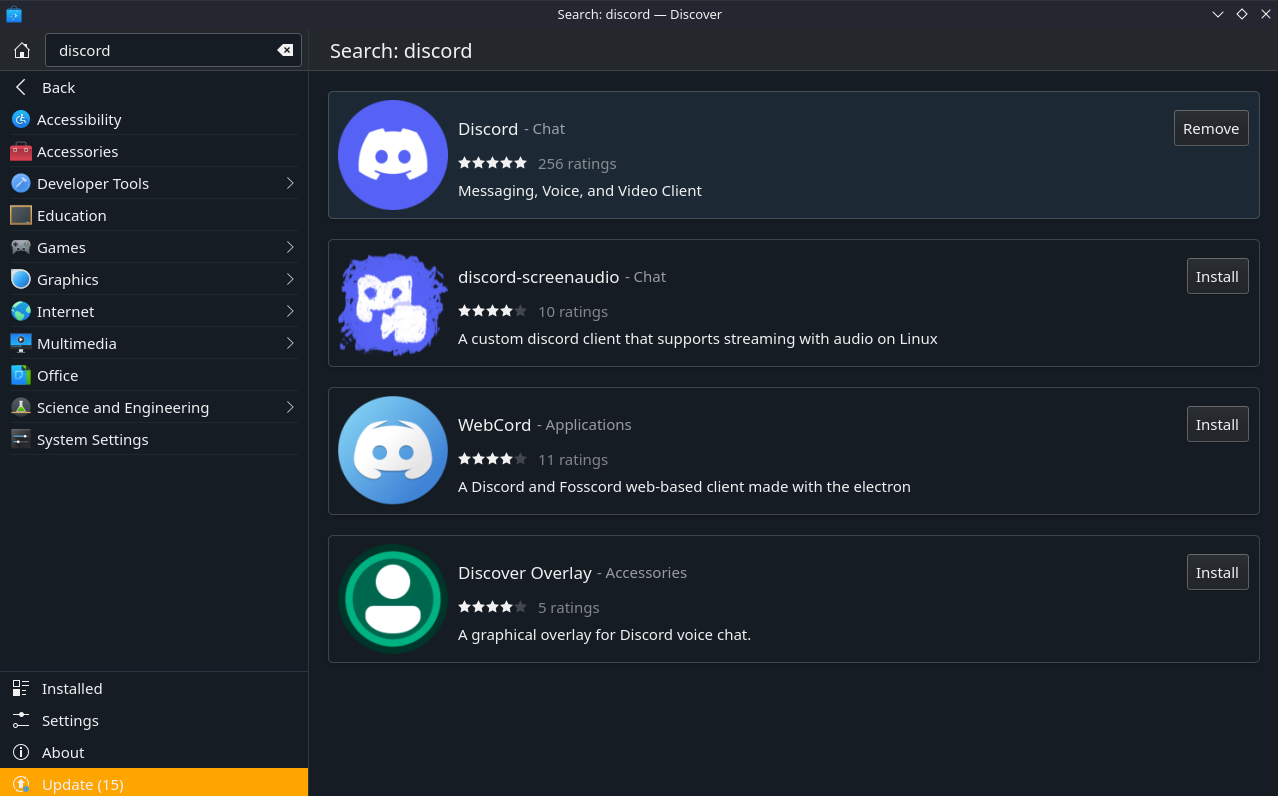
It all begins by installing Discord. Switch to Desktop Mode if you haven’t already, then open Discover and install Discord from there.
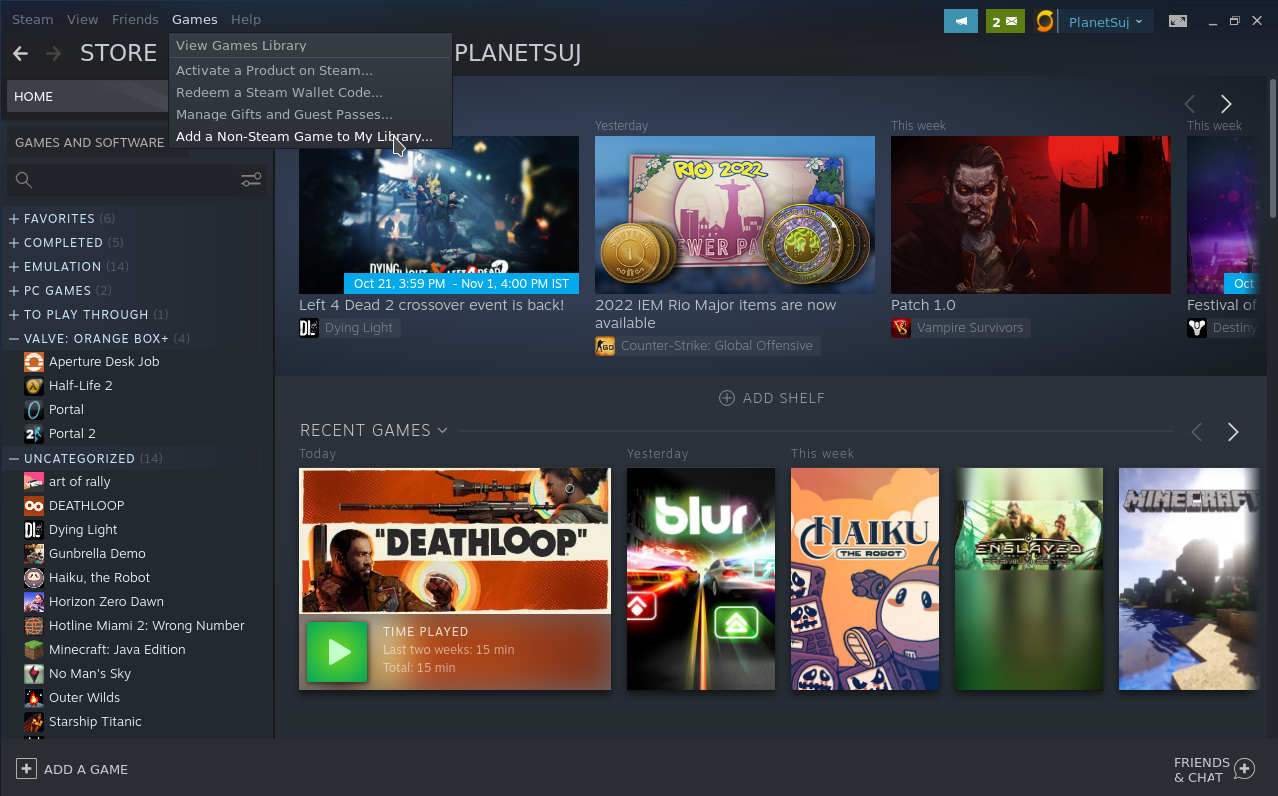
Once done, check Discord opens & works correctly, close it, then open up the Steam desktop client. Proceed to add Discord to Steam by heading to: ‘Games’ > ‘Add a Non-Steam Game to My Library’ in the menu bar at the top.
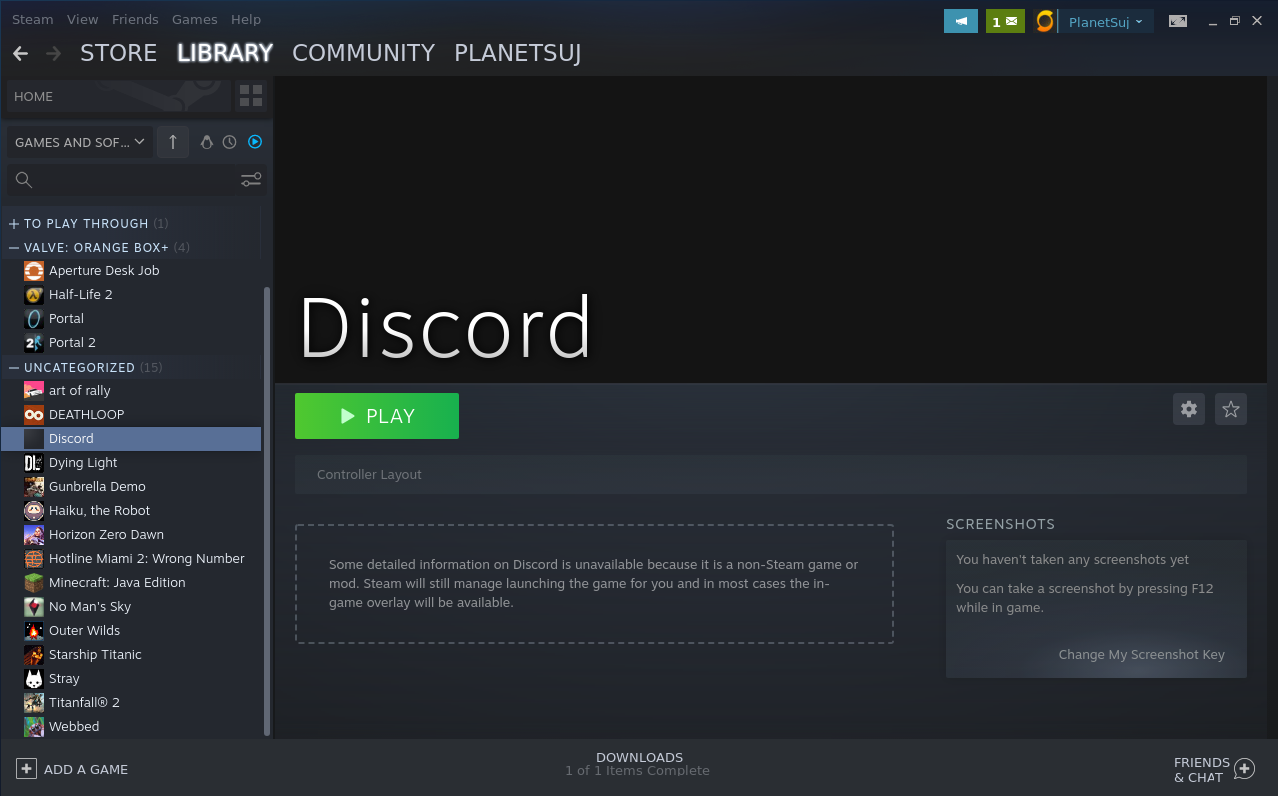
Success! You should now see it under ‘Library’ > ‘Home’ in the left-hand pane. Just one problem…….It looks horrible.
Not exactly pleasant to look at, but we will resolve that together! The go-to resource that you will find held in high regard around forums is the fantastic SteamGridDB. This site will allow you to find a wealth of artwork created by other users for many, many game titles. You can even customise native Steam game artwork if you wish. Where this gets slightly complicated is that to change artwork for any app, you have to add it in 5 different places. But don't worry, I’ll walk you through all the steps. Let's get into it!
The Steps To Get Discord Pretty
Download the following images and rename each as in their types (you can of course use alternatives, just make sure they follow the guidelines I’ve outlined in ‘Reference Info For Artwork’ at the end of the blog for best results):
Thumbnail: https://www.steamgriddb.com/grid/100623
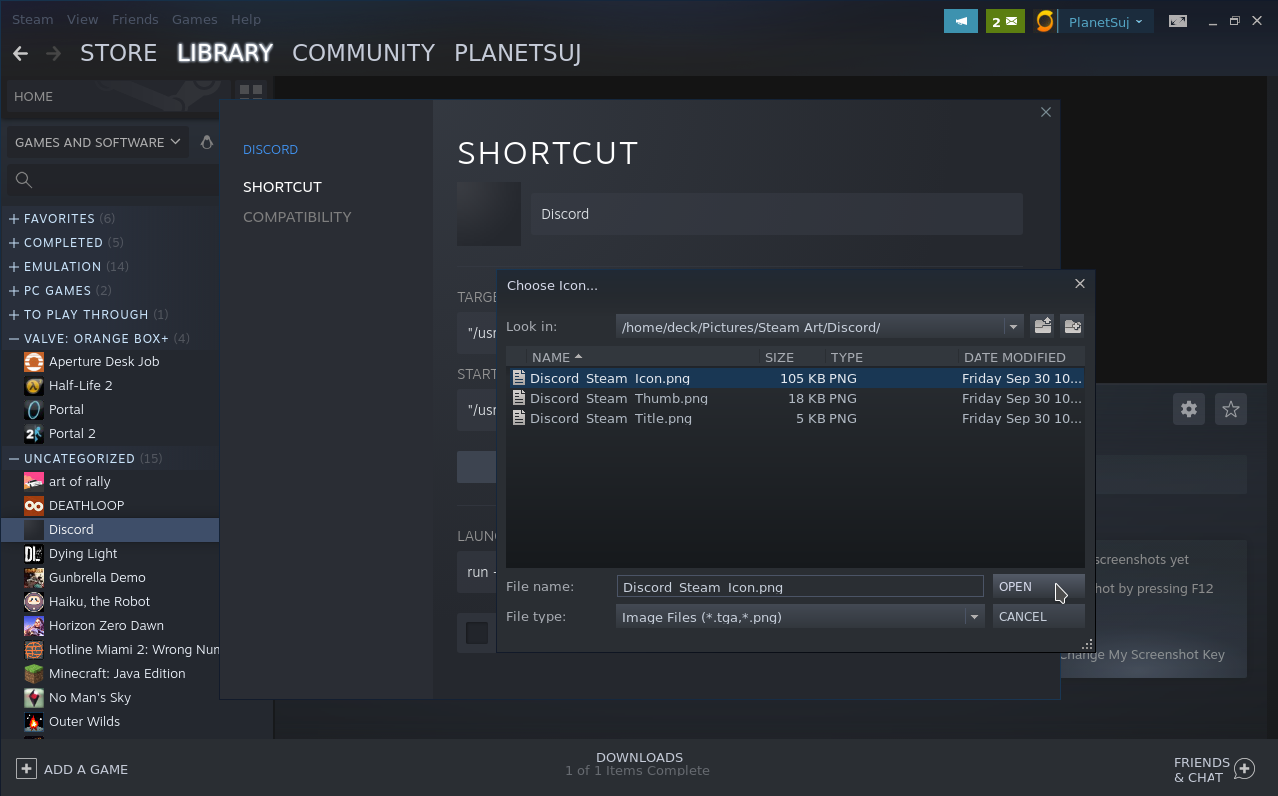
Remember to note the folder you put these in (usually somewhere in ‘Home/Deck/Pictures’ is a safe bet). Now to add the artwork. Start by right-clicking Discord in the left pane under ‘Library’ > ‘Home’. Head to ‘Properties’.

Click the square under the ‘Shortcut’ title, then locate your icon artwork and confirm. If for whatever reason you can’t see your art (e.g if it’s in .jpg format), click the dropdown menu next to ‘file type’ then select ‘all files’.
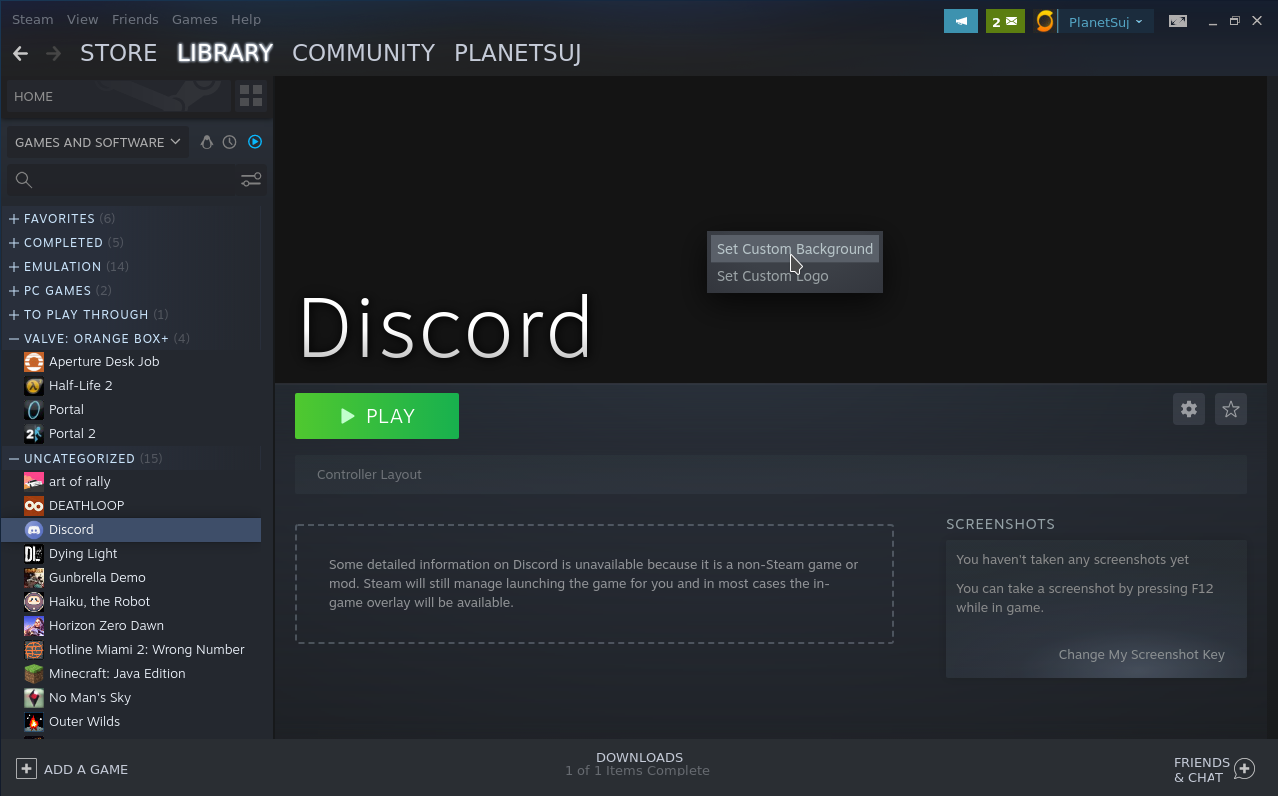
Now for the banner. Exit the dialog, then with Discord selected in the left pane, right-click the banner just above the green ‘Play’ button and select ‘Set Custom Background’. Pick your banner artwork as before.

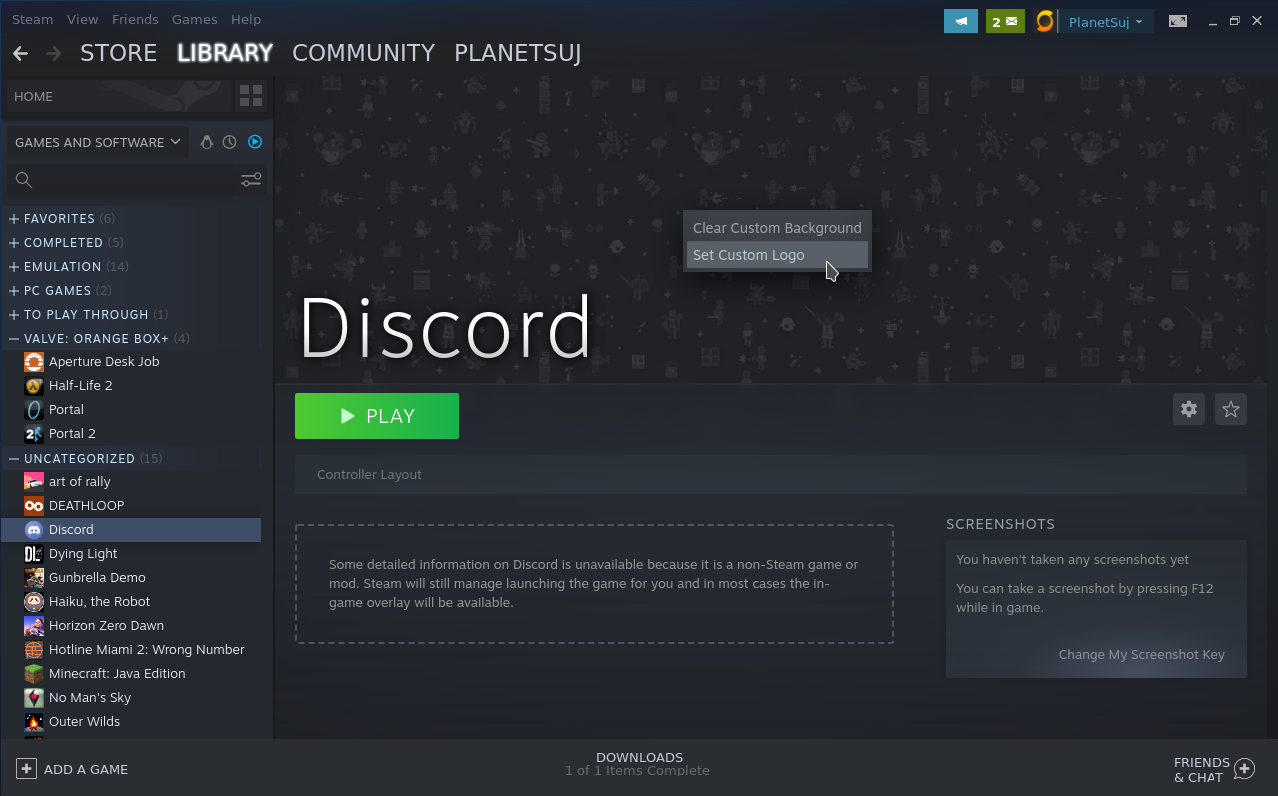
Changing the title is the same as the banner, except this time pick 'Set Custom Logo', then select your title artwork.
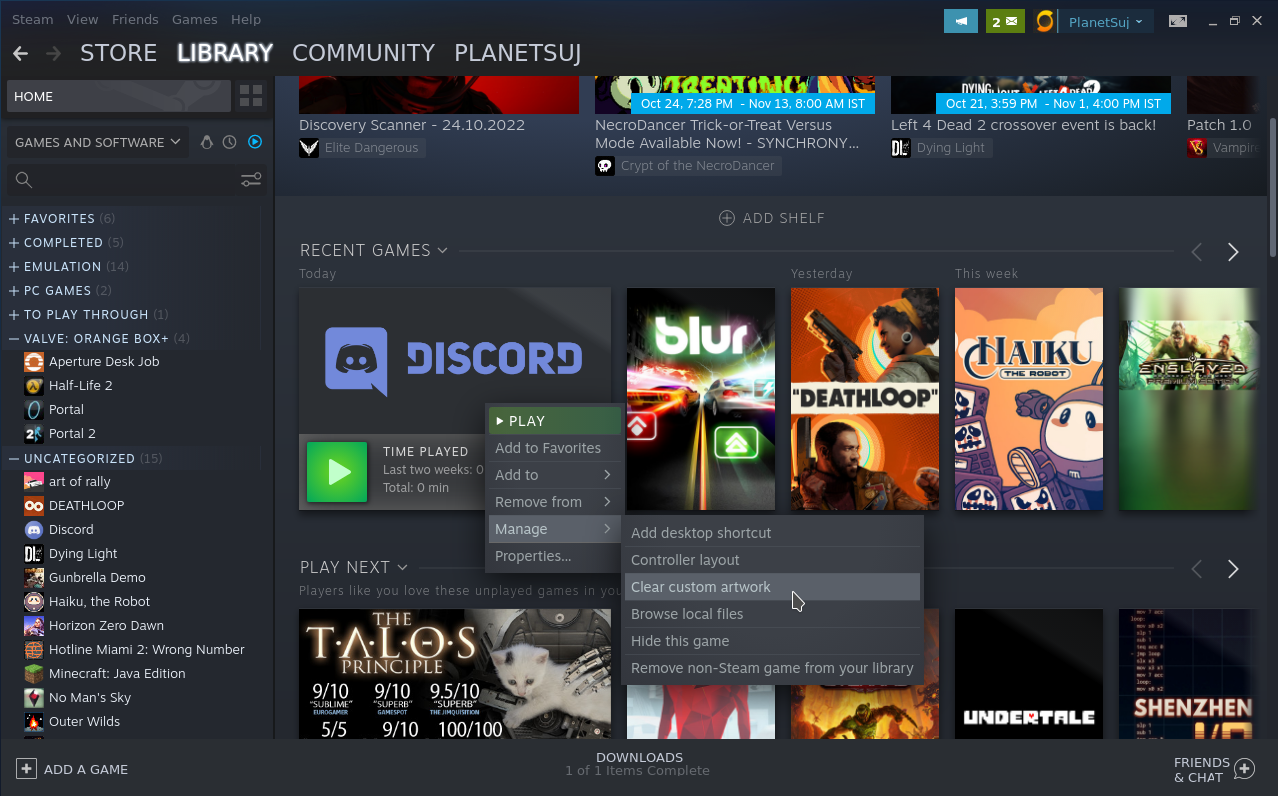
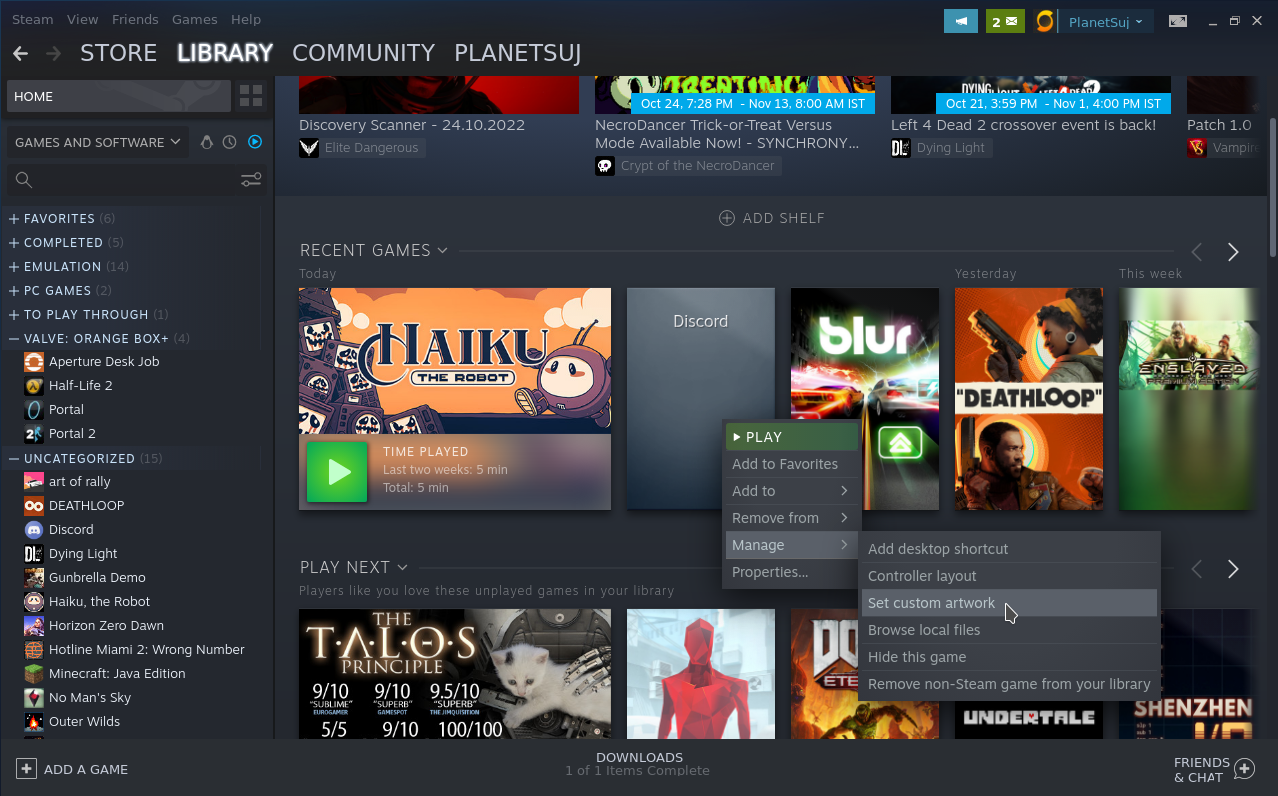
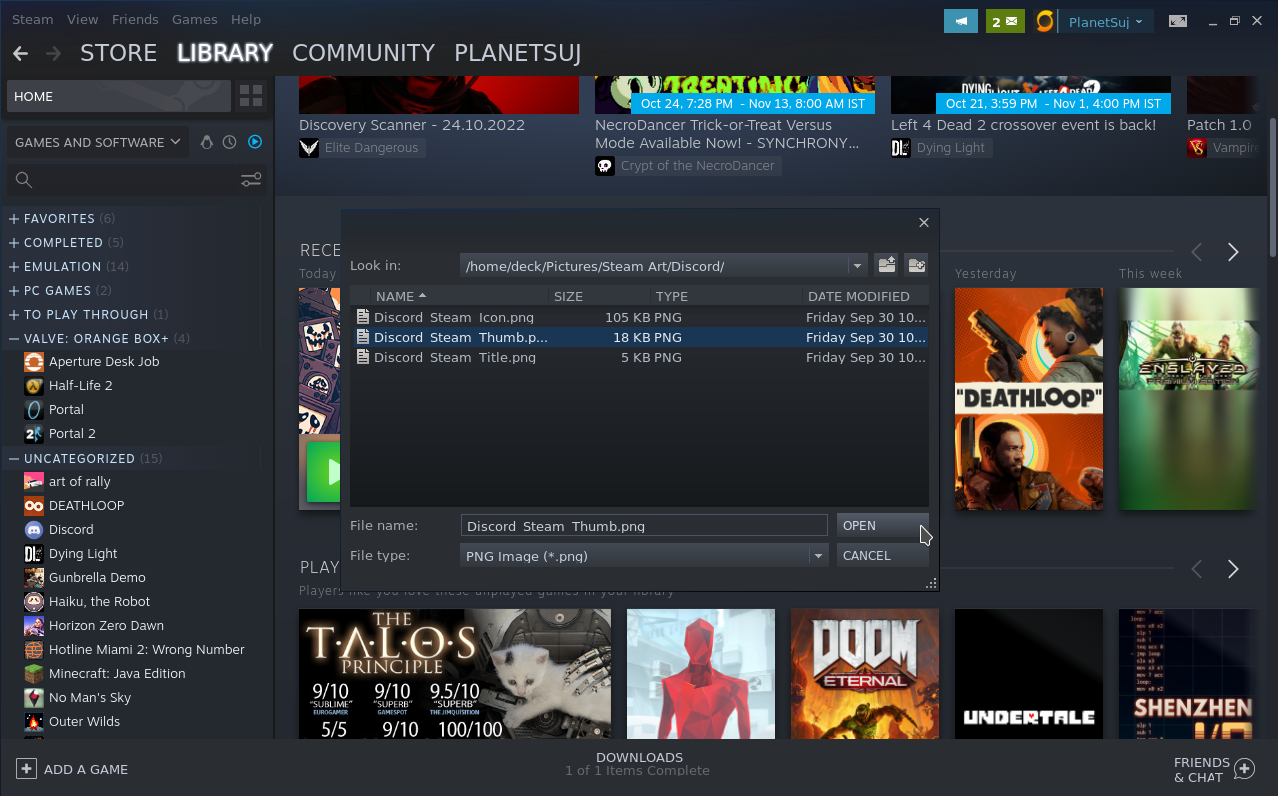
The last two pieces of artwork are the ones I got stuck on initially. You find these under ‘Library’ > 'Home' > 'Recent Games'. If Discord is not the ‘Last Game Played’, open & close it in Desktop Mode first before the next step. With Discord as the last game played, you might notice the title art shows here, and it looks good. But just to be thorough, we’ll change it this time. Right-click the app then go to ‘Manage’ > 'Clear custom artwork’. Right-click the app again and go to ‘Manage’ > 'Set custom artwork’, then pick your splash artwork.
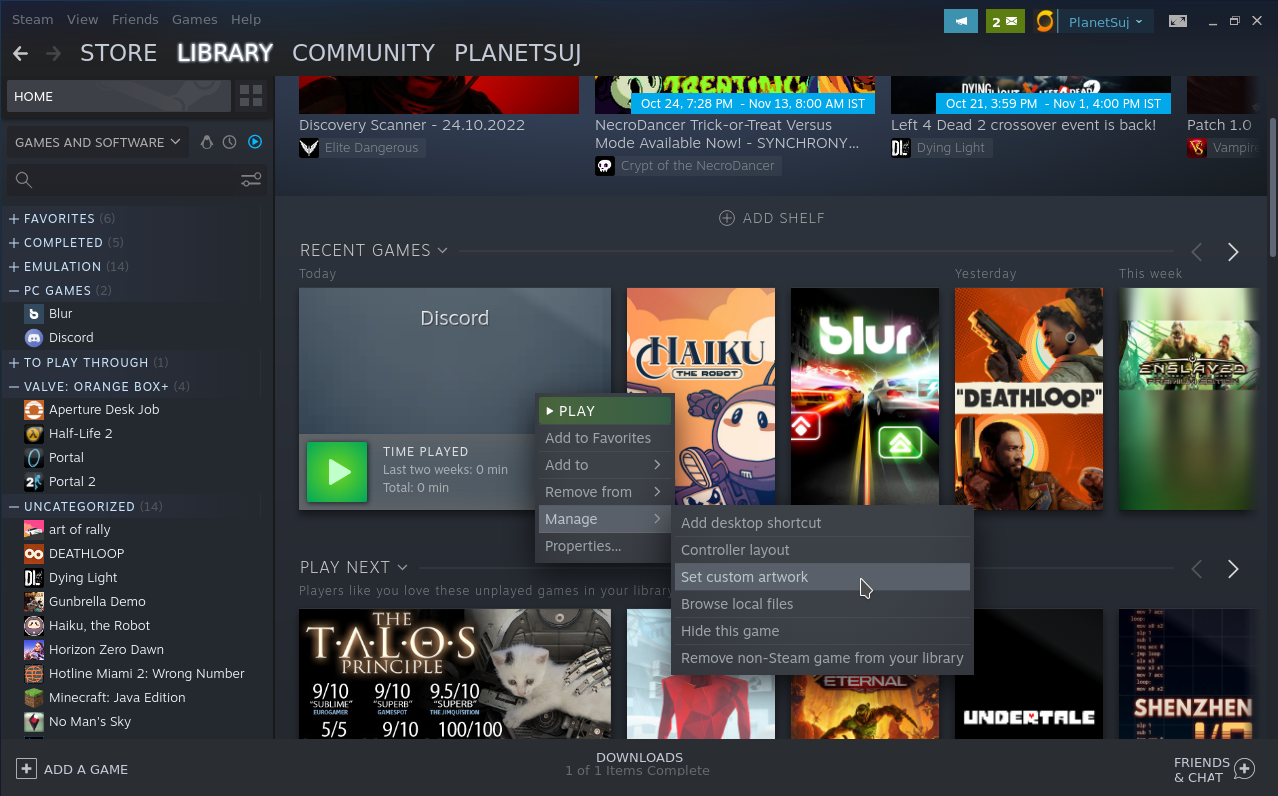

Next, fire up an app other than Discord in Steam then close. If done correctly, Discord should now still be in 'Recent Games' but not as the 'Last One Played'. Right-click the app then go to ‘Manage’ > 'Set custom artwork', only this time pick your thumbnail artwork.
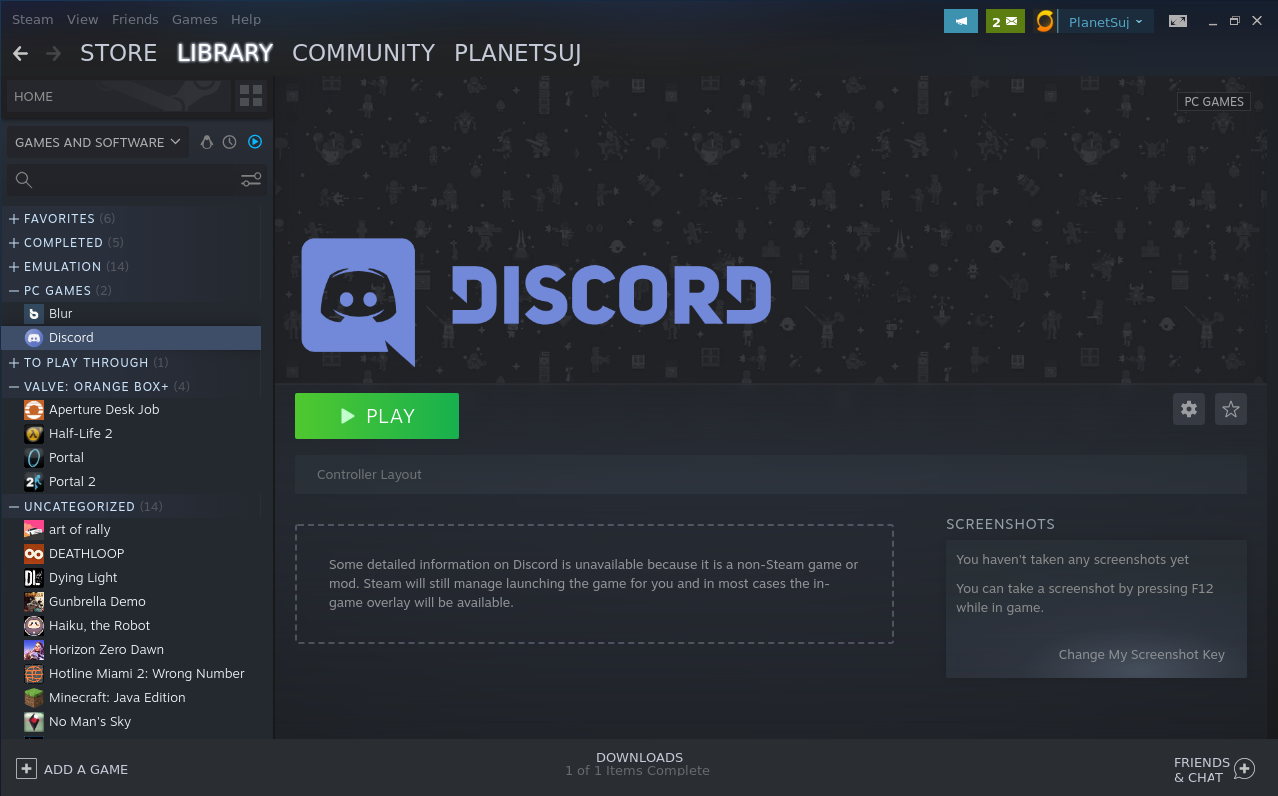
So that should be it, your beautiful finished product should look like this:


Good job, thanks for following this through to the end! Hopefully this should make it easier to add artwork for future apps, but if you do get a bit lost on where to find things, feel free to return here and check out the 'Reference Info for Artwork' section just below.
As usual, check back for more in the future!
Reference Info for Artwork
Artwork Visual Locations (I’ve named a few of these to make them easier to identify):
Icon: The very small picture next to the app name in the left pane
Banner (or Custom Background): The large banner that you see with the app selected, displayed above the green ‘Play’ button
Title (or Custom Logo): Displayed as the game title in the bottom left of the Custom Background
Thumbnail (or Custom Artwork 1): The portrait-oriented thumbnail picture displayed under recent games
Splash (or Custom Artwork 2): The landscape-oriented thumbnail that displays in the place of the thumbnail if the game has been played last
Where to Change Artwork:
Icon: Head to ‘Library’ > ‘Home’, then right-click the app in the left pane. Click properties, then click the empty square under ‘Shortcut’ title
Banner: Head to ‘Library’ > ‘Home’, then select the app in the left pane. Right click the picture just above the green ‘Play’ button and select ‘Set Custom Background’
Title: Head to ‘Library’ > ‘Home’, then select the app in the left pane. Right click the picture just above the green ‘Play’ button and select ‘Set Custom Logo’
Thumbnail: [The game has to have been played recently, but not as the last game played, to show this artwork] Head to ‘Library’ > ‘Home’, then find the game in the ‘RECENT GAMES’ section. Then right-click the game’s default artwork and select ‘Set custom artwork’.
Splash: [The game has to have been played last] Head to ‘Library’ > ‘Home’, then find the game in the ‘RECENT GAMES’ section. Then right-click the game’s default artwork and select ‘Set custom artwork’.
The Ideal Visual Framework:
Icon: 256x256, JPEG or PNG. Picture only.
Banner: 1920x620 or 3840x1240, JPEG or PNG. Picture only.
Title: 876x170 (although this can vary a bit), JPEG or PNG. Text logo and/or Icon only.
Thumbnail: 600x900, JPEG or PNG. Should include app title.
Splash: 920x430, JPEG or PNG. Should include app title.